My experience with a fresh Ubuntu 12.04 install
By Kit
After my botched Windows 8 install, I decided to go back to Ubuntu. I still would like to figure out a solution with Windows on this laptop so that I could use it for work but right now having linux is better. I decided to document some of the issues I ran into in case I need them later.
First, I downloaded the 64 bit ISO from ubuntu.com. My laptop doesn’t have a CD/DVD drive so I used the Linux Live USB Creator to create a bootable usb drive to install Ubuntu.
I was very impressed with the install process… very easy and extremely polished. Being able to start the OS install while answering configuration questions at the same time is genius.
Once it finished and restarted I installed the latest version of the System76 driver. I removed the USB drive and then chose to restart again.
Unfortunately, my laptop got stuck booting on a black screen with a blinking cursor. It wouldn’t boot up unless the USB drive was plugged in!
A quick google led me to this question so I installed Boot-Repair. I used the recommended repair and my laptop was then able to restart without the USB drive. Unfortunately, now there still is a boot menu that pops up. I was able to reduce the timeout to 3s which isn’t too bad.
Tweaks
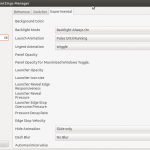
Unity bar takes a long time to come up
I found that this was due to my graphics settings.
Using CompizConfig (install via the Ubuntu Software Center) change Hide Animation to Slide only and Dash Blur to No Blur.
Brightness setting isn’t remembered
I set the value I wanted using the brightness app and then used cat /sys/class/backlight/acpi_video0/brightness to print out the value. Then I added the line to my rc.local file like here: http://askubuntu.com/a/68143/13016
LAMP stack
Please keep in mind, this section is really just notes that I am keeping for myself in case I need to set this up again. I think it may be useful to others but right now it isn’t very well documented.
I followed the first steps from here: https://help.ubuntu.com/community/ApacheMySQLPHP
For my setup, I created a public_html directory in my home directory and then wanted to configure apache2 to serve up the files from that directory.
Then followed http://elijatech.wordpress.com/2012/02/12/flexible-web-development-using-name-based-virtual-hosting/
Permissions were tough to figure out. Additional step I needed was <span class=“text”>sudo chmod -R 0755 public_html/</span>. This made it work but I’m not entirely sure that is the right way to do it.
Example sites-available config:
<VirtualHost *>
    ServerAdmin webmaster@localhost
    ServerName mysite

    DocumentRoot /home/kit/code/public_html/mysite
    <Directory /home/kit/code/public_html/mysite>
        Options Indexes FollowSymLinks MultiViews
        AllowOverride All
        Order allow,deny
        allow from all
    </Directory>
    ErrorLog /home/kit/code/public_html/mysite/logs/error.log
    LogLevel warn
    CustomLog /home/kit/code/public_html/mysite/logs/access.log combined
    ServerSignature On
</VirtualHost>
Update: 3/2/2013 I found this link which had slightly different steps and worked for me: http://www.debian-administration.org/articles/412
I also needed to add an entry to my /etc/hosts file so that I could use http://mysite/ in the browser:
127.0.0.1 mysite
This command doesn’t work like it says in the message: service apache2 reload. You have to use sudo /etc/init.d/apache2 restart instead.
Then, I followed the instructions here to install phpmyadmin: https://help.ubuntu.com/community/phpMyAdmin
You’ll be able to login to http://localhost/phpmyadmin with whichever username you configured.
XDebug
The research that I did online indicated that it would be hard to debug PHP files using Eclipse. I decided to try out Netbeans and Xdebug. Luckily, netbeans has some pretty good documentation. I found this page very helpful when editing my PHP.ini and trying to get Xdebug setup: http://wiki.netbeans.org/HowToConfigureXDebug
gksudo gedit "/etc/php5/apache2/php.ini" &
I added a section right below Module Settings:
;;;;;;;;;;;;;;;;;;;
; Module Settings ;
;;;;;;;;;;;;;;;;;;;

; added by Kit
zend_extension=/usr/lib/php5/xdebug.so
xdebug.remote_enable=1
xdebug.remote_handler=dbgp
xdebug.remote_mode=req
xdebug.remote_host=127.0.0.1
xdebug.remote_port=9000
; end of add by Kit
Then, you MUST restart apache. To test XDebug is configured, create your test.php file with <?php phpinfo(); ?> and make sure there is an XDebug section.
